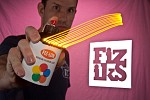
Light stencils are an easy way to add in graphic elements to long exposure shots. Basically, this is fired in the frame while the shutter is open during a long exposure. The graphic remains while the person and box is completely invisible. Watch the vid and make a box as directed. Using any illustration program print out your design onto fine grade paper which is slightly heavier than regular copy/printing paper. I print 2 and paste them together but make sure they are perfectly aligned by holding them up against a bright light source. I laminate mine so they can be reused as they often rip when removed or changed but this is not a necessary step. I usually set the flash to 1/8 which works well with the settings I use on my camera for...
Fiz-bird has had enough of his cage… Shot in the mountains of Okayama, Japan at Hoshijinja. The dome and yellow circle were created with LEDs. A 500 lumen LED light provides all lighting for the location.
This image was shot at Houfukuji Temple in Okayama, Japan. The sphere is amde with LED lights and the location is lit by hand with a xenon torch.
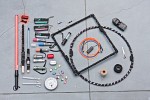
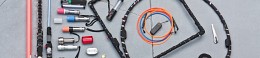
One of our main tools we use is a simple film canister. It is great for turning a directional flashlight in to a "bare bulb". It make the flashlight visible from almost any angle. This set up is what we use to make our orbs, domes, and any occasion that requires the light source to be visible at many different angles. To add color simply print out any color you want onto regular printer paper and tape it on. This particular flashlight is the perfect size for the canister to snap on and only costs around 8 bucks USD. They can be taped on if they don’t fit.